Subscribe below to receive Findings news (just 1 email per month). We will not sell your email address to third parties. No spam, easy to unsubscribe.
We designed Findings to be easy to use, easy to discover, even without a user manual. But if you prefer to have a full understanding of Findings before diving in, the user guide below is made for you.
For bug reports, please include as much detail as possible, so we can reproduce it: bugreport@findingsapp.com.
Any question,feature request, or other feedback: feedback@findingsapp.com.
We will send you news about Findings every 1-2 months.
We will not sell your email address to third parties. No spam, easy to unsubscribe.
Thank you for subscribing. Check your inbox for a confirmation email.
Findings is a Mac electronic lab notebook designed for scientists that aims to replace the paper lab notebook still in use in most research labs. Lab notebooks are crucial when running experiments to keep track of what one is doing so that results can later be reproduced, assembled and published. There is something great about paper and the freedom and flexibility it affords, however since 2014 paper has started to show its limits in areas where computers are taking over such as storing results, analysing data, searching, replicating, sharing, preserving, and more. Findings is a good fit for “academic” research, where new assays and new types of experiments are designed and used every day, and where flexibility is key.
Findings ambition is simple: making your computer THE tool to run experiments and keep lab records so that results can later be reproduced, assembled and published effortlessly.
In the lab, an experiment aims to answer a simple scientific question. In Findings, an experiment is a document where you log the steps you follow and store the results. Because Findings is running on a computer, there are many ways you can view an experiment and interact with it, depending on the context, and depending on what you are trying to achieve.
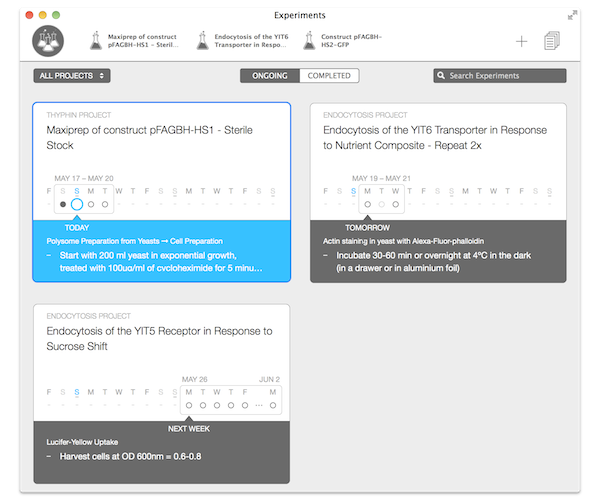
Experiment library. All your experiments are displayed in the main ‘Experiments’ view, which you can select by clicking the flasks icon on the top left of the window. Inside this view, each experiment is represented by a “card”. The list of visible experiments can be filtered based on the project they belong to (see more on projects below), whether they are still ongoing or are already completed, and finally based on the simple search string. You can easily toggle between ongoing and completed experiments using the segmented button on top of the experiment cards.
Ongoing experiments. When going through your day or planning your week, you will typically show the “ongoing” experiments. These are simply the experiments still running and requiring your attention. Findings displays a simple summary of each of them: the title, a simplified calendar strip and the next task. In the calendar strip, days with content are shown in a darker color, and days in the past are filled. For experiments with task running today, a different color is used, and the circle representing today in the calendar strip gets filled as you make progress throgh your day. The bottom of an experiment card displays the next task to perform. You can mark the task done by clicking on the checkmark on the left side of the task (to undo, use the circular arrow icon on the right side).
Completed experiments. You typically switch to the “completed” experiments when you need to review your past work, for instance to prepare a report, an article or a presentation. An experiment is automatically moved to the completed section, when there are no more task to be done today or in the future. The completed experiments still show the title and a simple calendar strip, and are simply sorted based on time.
Creating an experiment. When you are browsing your experiments, you can simply create a new one using the '+' button in the title bar, or using the File menu. If you have selected an experiment card, or already have an experiment opened, you can also choose to duplicate the experiment. This will create a complete copy, including a copy of the files you may have inserted. This is a great way to repeat an interesting result that can be published with confidence.
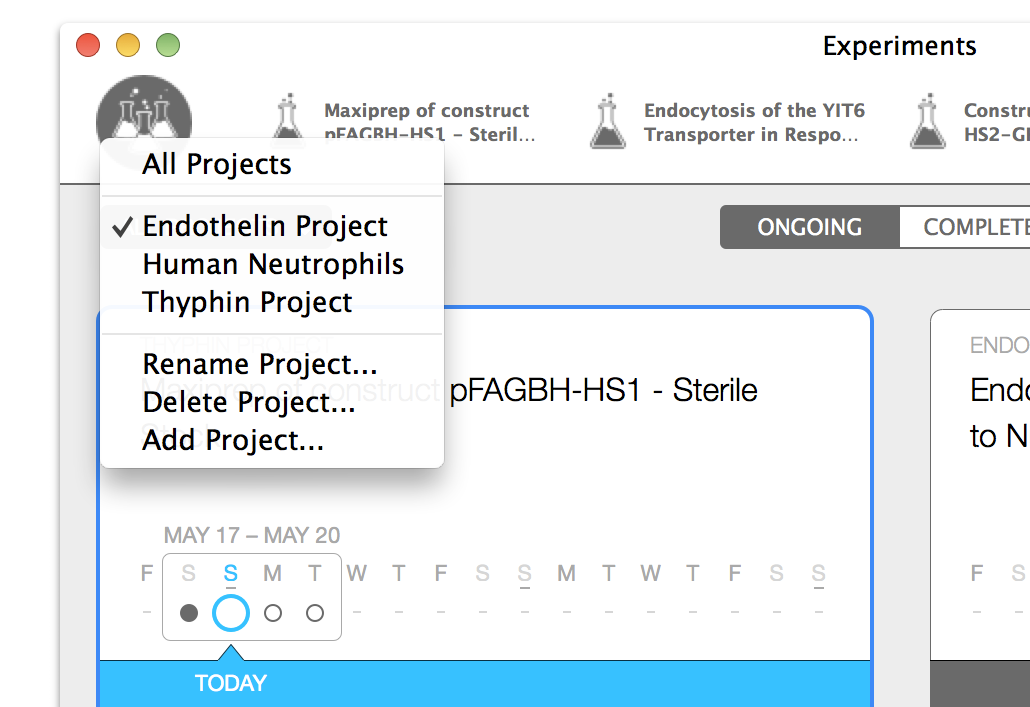
Projects. Each experiment can be assigned to a specific project (see “Opening an experiment” below). This allows to filter based on projects, using the popup menu on the top left of the experiment cards. This menu can also be used to rename the currently selected project, and to create a new project (project deletion is coming soon!).
Opening an experiment. To open an experiment, double-click on the card, which also creates a tab in the title bar. You can thus open a subset of your experiments in tabs, to make it easier to go back to them as needed by simply selecting the corresponding tab. Under the tab, there are two main sections. The top header with a blue background is where you can see and edit the metadata: project, title, aims, rating and thumbnail (currently only showing a default icon). Below the header, is the actual content, which can be displayed in one of three modes, using the segmented control at the bottom right of the header. The first mode displays the content as text. The second and third mode displays the content of the experiment as a calendar view, with or without a protocol browser. Both modes are described in more detail below.
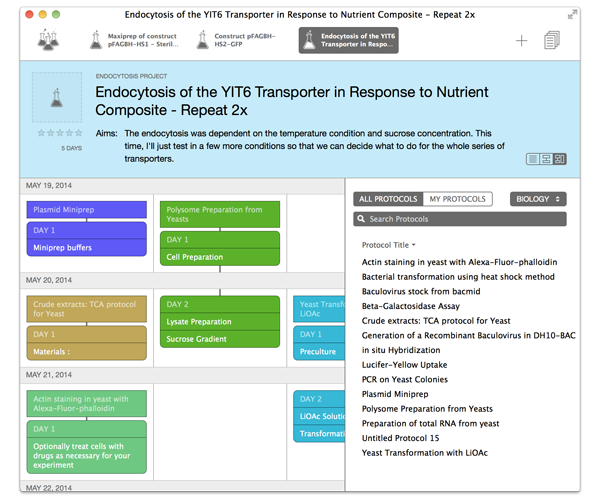
Calendar view. In many fields of science, it can be very useful to think of experiments as the implementation of a series of protocols. You can very easily combine protocols using the calendar view: just drag and drop them from the protocol browser on the right, and into the days you plan to run them. Each protocol will appear as a vertical series of boxes. You can then easily move those protocols around to your liking, or remove them by clicking the 'x' icon. A protocol can span several days, and you can have multiple protocols running in parallel, but thanks to the calendar view, you can get a birds eye view of your week and make sure it can fit in your schedule.
Text view. In the text mode, the content of the experiment is always shown in temporal order, in an editor similar to any other text editor, but with only the tools that make sense for a document of that kind. If you have prepared the outline of your experiment in the calendar view, by combining protocols, most of the detailed content of your experiment will already be in there, but you can also start with an empty page and type the content directly as you go. It is up to you to decide what an experiment looks like.
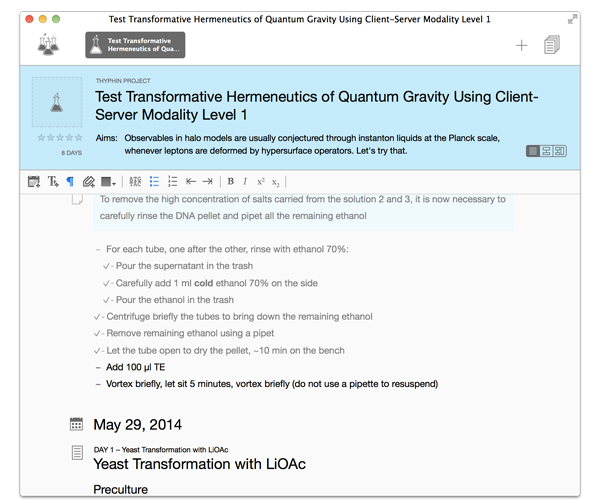
Experiment structure. The structure of an experiment is thus very flexible. However, Findings also allows you to add a simple structure that will keep your lab notebook consistent and easier to browse to you and to others. Your document can follow a simple hierachy with three levels of headers: day headers, then “protocol headers” and section headers. The protocol headers are created when you drag entire protocols in the calendar view, as detailed above. Below that level, the section headers are a great way to divide large protocols in multiple groups of tasks. The sections headers will also appear in the calendar view, and can then be easily reordered, so they are very useful in adding more fine-grained information. You can use the triangle icons in the left gutter to fold/unfold the entire content of a day, a protocol or a section.
Text formatting. In addition to the different headers, a number of options are available to format the text of your experiment. At the paragraph levels, you can have bulleted or numbered lists, fixed-width text (great for DNA sequences, or to align numbers in a table-like arrangement, or to display code) and notes of different kinds (three colors available). Within a paragraph, simple styling options allow you to apply bold, italics, superscript and subscript. The goal of these different options is to keep the text editor simple, and to let you focus on the content, while still allowing for simple variations that make sense for displaying a scientific experiment.
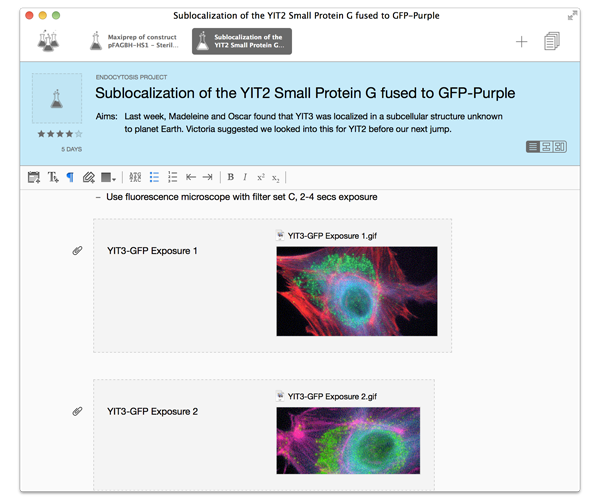
Adding files. In addition to the different formatting options detailed above, you can also insert files, either by using the corresponding attachment icon in the toolbar, or dragging a file from disk. When adding a file, it is copied inside your Findings library, so that it is always safe and cannot be accidentally removed or overwritten (we will soon provide a way to optionally store an alias to files or directories for larger files, or for files hosted on network drives). Findings will display a preview in the experiment itself if possible (using the Quicklook functionality of Mac OS X). The file can also be double-clicked to open and edit it in the application of your choice. The text next to an attachment can be edited, so each attachment can have a custom legend.
Protocols are the methods you follow when running an experiment. In Findings, protocols are building blocks for your experiment (see above as well). You can combine them and drag them into your calendar.
Protocol library. Protocols have a special place in Findings, where you can browse, edit, and organize them. Findings comes with a few built-in protocols, to get you started, and to show you examples. Your library of protocols will grow as you create new ones. When browsing protocols, you can filter them based on the science field (biology, physics, etc...), based on the author (all or just yours), or using a simple search string. In addition, the list of protocol can be sorted based on the different columns by simply clicking on the corresponding column headers.
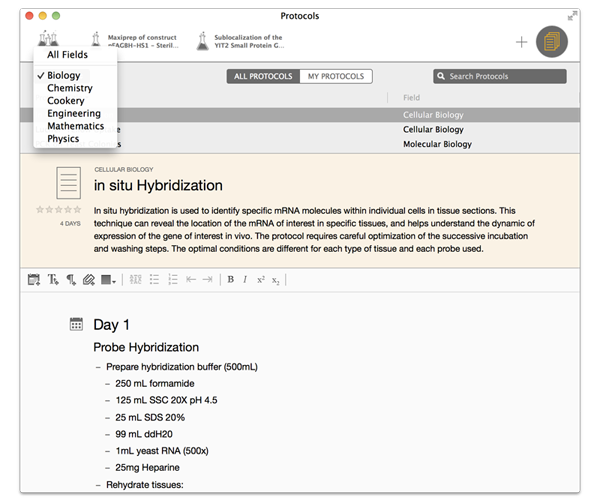
Creating a protocol. When you are browsing your protocols, you can simply create a new one using the '+' button in the title bar, or using the File menu. Newly created protocols will automatically set you as the author, and will be found under 'Your Protocols'.
Editing a protocol. Just like an experiment, a protocol includes a top header (with a light orange background) where you can see and edit the metadata: field, title, summary and rating. Below the header, is the actual text content. The text editor is very similar to the one used for experiments, with the content in chronological order, with day headers corresponding to day 1, day 2, etc... For convenience, is is possible to set a 'day -1', or a 'day 0', which sometimes make more sense for some protocols. Just like with an experiment, it is up to you to decide what a protocol looks like, and how it should be structured. It helps to make use of section headers, though, as this will also make your experiment content more consistent and easier to follow.
How to obtain a student discount?
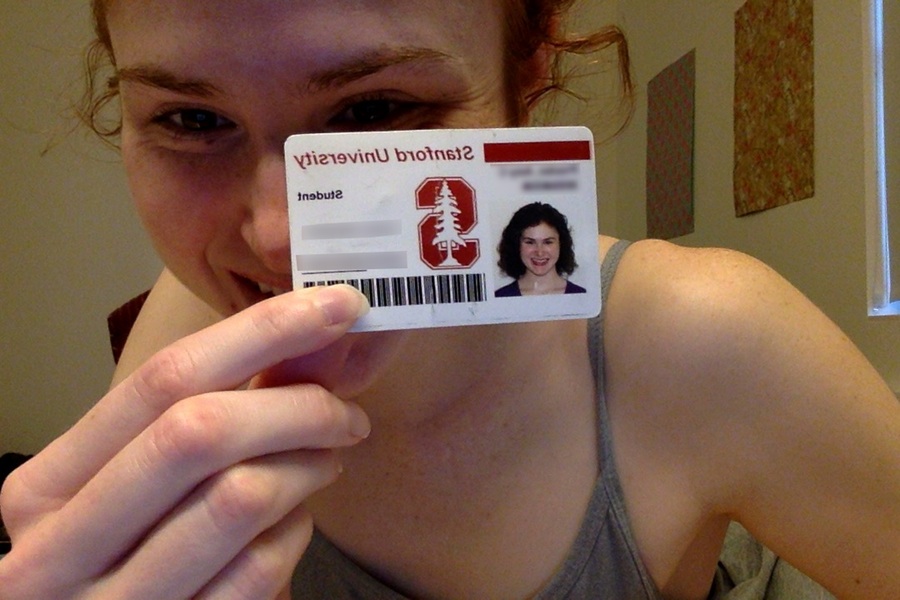
As a student, you can get a 40% discount on a Findings license (and enjoy the exact same benefits as the full-price license). For this, you will need to get a coupon from us before purchasing Findings. We cannot apply the discount if you already purchased Findings at the full-price. To receive a coupon, send an email to feedback@findingsapp.com with a proof of studentship. This can be a scanned picture of your student card, or proof of your name listed on an official document or website of your institution. We will send you a coupon within 48 hours, with instructions on using it to purchase a Findings license.
How to obtain a group discount?
We offer group discounts of 20% or more for purchases of 5 or more licenses. Please contact us by email at feedback@findingsapp.com for more details.
Where is my library stored?
Findings stores all the data on your computer, nothing goes to our servers. You can reveal the location of your Findings library in Finder by going into the menu Findings > Preferences, and then under the Library tab. Click the 'Reveal' button. You can browse the contents of your library, but do not rename any of the files or folders and do not move them. If you need to create a backup, it is best to quit Findings first to make sure you include all the recent changes and that they are consistent. You should not access this library from two different computers running Findings at the same time (e.g. using Dropbox) as this will result in corruption. If you choose to use Dropbox for syncing, the data will be on Dropbox servers, but we also can’t access that.
Can I sync my library with Dropbox and use Findings on two Macs?
Yes. When enabling Dropbox you will be asked to (1) Authenticate with Dropbox, which is done in Safari; this is required to let Findings access its special application folder in Dropbox, and (2) Choose the Dropbox folder on disk so Findings knows where to find the files and is allowed direct access to the files on disk. Please make sure you do a regular backup as well using for example, Time Machine or Super Duper. You can find your folder, if Dropbox sync is enabled, in Dropbox/Apps/Findings.
What are all those files in my library?
The 'Persistent' directory contains some non-critical, basic metadata about your library. The 'Derived' directory contains non-critical derived information about your library, that is used to display your experiments and protocols, and search them. The 'Local' directory contains your actual documents, which are organized in sudirectories 'Experiments' and 'Protocols'. Each document is a file package that contains your data, using the open-source key-value store implementation PARStore. The attachments are also stored inside the file package corresponding to the experiment or protocol, inside a subdirectory 'attachments'. Each of the experiments, protocols and attachments are uniquely identified using a universal identifier (aka UUID).
How to import a protocol from markdown?
For proper import, markdown documents must follow a specific format to include metadata like title, summary and field, and to make sure the days and sections of the protocol are correctly formatted. The metadata should be included at the top, using a simple key-value scheme that is specific to Findings (see example). The metadata ends at the first day of content. Each day should start with a top-level heading, that include the relative day, e.g. "Day 1". Level-3 headers can be used for section titles within a day, for instance "### Preparation" (do no use level-2 headers). Bulleted lists, numbered lists and code blocks follow the usual markdown format. Notes are indicated using the markdown convention for quotes at level 2, 3, or 4, as in ">> Note", or ">>> Warning" or finally ">>>> Problem" to get the different note levels supported by Findings. Attachments are added using the markdown convention for images, as a separate paragraph, e.g. "" (paths can be relative or absolute). Here is an example to help you explore the different options for markdown import.
I found out that the attachments that I removed from my experiment are still there.
Indeed, the attachments are not removed when deleted, at the moment. The reason is simply that there are complications with the undo feature, and potential issues with sync. You can manually remove a file if needed, for instance if they are particularly large and eat into your Dropbox account.
Is it possible to use others ways to synchronize our protocols between the Mac and the iPhone app such as using iCloud (or iCloud Drive) or over Wi-Fi or USB cable?
At the moment, we do not support other file synchronization systems than Dropbox. However, our implementation could in theory work with similar systems, including external drives, network drives, Google Drive, MS OneDrive, and potentially iCloud. We cannot promise when we will go beyond Dropbox sync, but we should be able to offer more options in the future. Please let us know your needs by sending an email to feedback@findingsapp.com
I cannot remove days, notes, images or tables.
To remove those elements, you can use the 'X' icon on the left side of the editor. Alternatively, make sure you select the paragraph before and after these elements, then press the delete key.
Is it possible to rename the protocol fields and subfields, and add new ones?
At the moment it is not possible to create your own field/subfields in protocols. It is a conscious decision to keep those as a built-in list. It is a compromise to make sure these stay consistent between different users, which will help facilitate exchange of protocols in the near future. We are very much aware that there is a need for more subfields. Given that we will have fairly frequent updates, it is easy for us to add them. Please do let us know what specific field or subfield you would like, by sending us an email at feedback@findingsapp.com
I find it very hard to re-arrange methods and notes in experiments.
It is possible to move sections around in the calendar view. For now this is the best way to do it, though this will be improved in the future. For attachments or notes, these ought to be draggable. It is technically tricky, hence it is not there yet, but it's also on our to-do list. It would indeed increase usability and make the editor more flexible and more enjoyable to use.
Why am I not getting notifications from timers, and why are they not showing in the notification center?
Timers were added to the iOS app and the Mac app in version 1.2. On both platforms, timers are integrated into the notification system and will appear in the notification center. However, if you have denied access to Findings to the notification system when first prompted, you may not see any timer notification. To enable notifications again on iOS, open the Settings app, go into Notifications, select the Findings app, and make sure that notifications are turned on. On Mac, open System Preferences from the Apple menu, then click the Notifications icon, and adjust the settings for Findings.
Is is possible to take pictures from your phone or facetime camera while in the app and import those to an experiment?
It is indeed possible to insert pictures from the iPhone camera in the iOS version of Findings. You can use the '+' button at the bottom of the experiment (the photo will be added at the end of the day), or below a specific paragraph, by tapping the paragraph, then tapping the camera icon.
Is there any possibility to draw directly molecules or chemical reactions in a protocol or experiment? Can we copy molecules or reactions from ChemDraw or ChemDoodle and paste it in a protocol of Findings?
You can paste any file into a protocol (or an experiment) including ChemDraw or ChemDoodle files. Pasting from those programs should result in the pasting of a PDF file, which will retain the ability to be pasted back into ChemDraw and be edited again. The way Findings works is that it simply stores files ("attachments") along your experiment or protocol, and show a preview. When you double-click on the file, it opens in the default app for that type of file, typically Preview.app for PDFs. You should then be able to copy-paste into ChemDraw again. Note that you cannot use the 'copy' function for a file from Findings (a limitation that we hope to lift in a future version of Findings).
Is there a way to add special characters such as Greek letters?
The insertion of special characters is possible using the menu Edit > Special Characters. This opens the system-wide panel for insertion of special characters and symbols. If there are symbols you use often, you can mark them as favorites, making it easier to get back to them quickly. We plan to introduce in a future version an even easier way to insert special characters using the editor toolbar directly. Let us know what type of characters you would like us to support, by sending us an email at feedback@findingsapp.com
How can I subscribe to the beta updates and early pre-release versions of Findings?
To subscribe to the beta updates, you can check the checkbox “include pre-release and beta versions” under Preferences tab -> Options under the Findings menu.
Will there be a release of Findings for iPad in the near future?
We initially developed the iOS version of Findings by designing it for iPhone / iPod Touch. Our goal was to have a user interface really designed for that form factor, taking advantage of the touch interface, the small size, and the camera (and potentially the GPS). It is thus designed for use at the bench, and mostly for running experiments and taking quick notes. Editing is also possible but not the main focus of the app, which we think works best on the Mac at the moment. It works letter-boxed on the iPad for now, and does not use the entire screen. But we are working on adapting the user interface to use more of the screen, so it looks better on iPhone 6+ as well as iPad. It will be universal when it comes on the iPad, and thus won't require a separate download. Next, we might work on an iPad version that brings it more on par with the Mac version, depending on the demand. Let us know what you would like to see on iPad using our feedback email.
Are you considering releasing Findings for Windows?
We do not have a Windows version in development at the moment. Depending on the demand, we will consider developing a separate version in the future.